Step-by-Step Turn Your WordPress Site into a Headless Setup | WP Care
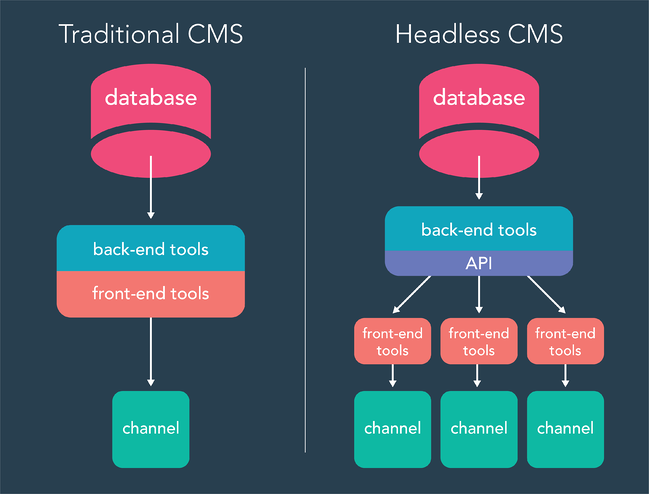
In traditional WordPress setups, the backend (PHP + WP templates) and frontend (theme) are tightly coupled. But in a Headless Setup architecture, you decouple them: WordPress stays as a content management system (CMS) in the backend, while a separate frontend (React, Vue, Next.js, etc.) handles rendering.
This gives you many advantages: faster performance, greater frontend flexibility, better scalability, and the ability to integrate with multiple channels (web, mobile, IoT). But you also need to think about SEO, metadata, and how to fetch content via APIs.
In this guide, we’ll walk you step by step — with examples — on how to turn your WordPress site into a headless setup, and importantly, how to maintain SEO using AIOSEO.
What is Headless WordPress & Why Use It?
Traditional vs Headless
| Traditional | Headless |
|---|---|
| WordPress theme + PHP templates generate HTML | WordPress only provides content via APIs |
| Frontend and backend intertwined | Backend and frontend decoupled |
| Limited to WP theming system | Use React, Vue, Svelte, Next.js, etc. |
| SEO, metadata, rendering handled in PHP | SEO/meta must be handled in frontend or via API |
Benefits
- Performance (less PHP rendering, caching, static generation)
- Flexibility to choose modern frontend frameworks
- Multi-channel content (same CMS for web, mobile, etc.)
- More maintainable frontend code
Caveats / Challenges
- SEO and metadata must be handled manually
- Need to secure API endpoints
- More development overhead
- Content previewing / editing can be trickier
How AIOSEO Helps with Headless WordPress Setup
One big challenge when you go headless is: how do you still manage SEO tags, meta descriptions, Open Graph tags, JSON-LD schema, etc.?
This is where AIOSEO’s REST API addon comes in. It allows you to fetch and output all SEO metadata via the WordPress REST API.
- With the REST API addon, AIOSEO exposes fields like
aioseo_head,aioseo_head_json, andaioseo_meta_datain API responses. - You can then use that data in your frontend to render SEO tags properly.
- If needed, you can also update AIOSEO metadata via POST/PUT requests to the REST API (with proper authentication) using
aioseo_meta_data. - This gives you full control of SEO in a decoupled setup.
Thus, the headless architecture doesn’t break SEO if you plan correctly and use tools like AIOSEO’s integration.
Step-by-Step Guide to Setting Up Headless WordPress
Below is a recommended workflow to convert your WP site into a headless setup.
1. Prepare Your WordPress Backend
- Backup your site (files + database).
- Use a staging environment to test headless changes.
- Enable the WordPress REST API (it’s enabled by default for posts, pages, etc.).
- Restrict or secure routes (e.g. require authentication for write operations).
- Disable unnecessary front-end rendering (you can use minimal or blank theme) — you might want to keep a fallback, e.g. a “preview” or “iframe” view.
- Clean up permalinks, rewrite rules, and ensure custom post types / taxonomies support
show_in_rest.
2. Choose / Build a Frontend
Pick a framework: e.g. Next.js, Gatsby, Nuxt, Vue, SvelteKit, or plain React/Vue. Using a static site generator is often recommended:
- Fetch content via
GET /wp/v2/posts,wp/v2/pages, and custom endpoints. - Use AIOSEO’s SEO fields (via
aioseo_heador JSON) to render<title>,<meta>tags, structured data, etc. - For dynamic parts (e.g. search, filtering), fetch API on client or server side.
- Use static generation (SSG) or incremental static regeneration (ISR) where possible for performance.
3. Fetch SEO & Meta Data
In your frontend, when you request content (e.g. a blog post), also request:
GET /wp-json/wp/v2/posts/<id>?_fields=title,content,excerpt,aioseo_head,aioseo_head_json,aioseo_meta_data
- Use
aioseo_headto directly output the raw SEO metadata string in your<head>. - Or parse
aioseo_head_json/aioseo_meta_datato selectively output tags. - Fetch taxonomies and term SEO meta via similar endpoints.
- For updates to SEO metadata, your frontend admin or CMS UI can send a PUT request with
aioseo_meta_data. (Requires authentication & correct capability)
4. Render Meta and Schema Markup
Ensure your frontend includes:
<title>and description<meta name="description">from AIOSEO data- Social/Open Graph tags (
og:title,og:description,og:image, etc.) - Canonical URL
- JSON-LD schema markup
- Robots meta tag
- Any other AIOSEO advanced meta (breadcrumbs, link tags, etc.)
You may also want to conditionally include AIOSEO’s <head> block if you just output aioseo_head.
5. Routing, Preview, and Fallbacks
- For preview / live editing, you may need to build a route to preview drafts (using authenticated API).
- Provide a fallback frontend theme or minimal “viewer” in case APIs are unavailable.
- Handle 404s, dynamic pages, etc.
6. Deployment & Hosting
- Build frontend and host it separately (Vercel, Netlify, Cloudflare Pages, etc.)
- WordPress backend remains hosted on your usual WP-friendly host
- Use CORS, caching, CDN for API responses
- Use HTTP/2 or HTTP/3, use caching headers
7. Testing, Monitoring & SEO Checks
- Use tools like Lighthouse, WebPageTest to test performance and SEO
- Check structured data with Google’s Rich Results tool
- Monitor API latency, error rates
- Test on mobile, accessibility, etc.
Example: Minimal Fetch + SEO Render (React / Next.js Hypothetical)
import React from 'react';
import Head from 'next/head';

export async function getStaticProps({ params }) {
  const res = await fetch(`https://yourdomain.com/wp-json/wp/v2/posts/${params.slug}?_fields=title,content,aioseo_head`);
  const post = await res.json();
  return { props: { post } };
}

function PostPage({ post }) {
  return (
    <>
      <Head>
        <title>{post.title.rendered}</title>
        <meta dangerouslySetInnerHTML={{ __html: post.aioseo_head }} />
      </Head>
      <article dangerouslySetInnerHTML={{ __html: post.content.rendered }} />
    </>
  );
}

export default PostPage;
This simplistic example uses aioseo_head raw HTML to insert meta tags. A more advanced approach would parse aioseo_head_json and selectively render tags.
SEO Tips & Best Practices with Headless + AIOSEO
- Always include canonical URLs and meta descriptions
- Use structured data / JSON-LD via AIOSEO and output it
- Cache API responses to reduce load
- Use fallback metadata if AIOSEO fields are missing
- For pagination, implement meta tags properly
- Regularly audit your frontend output for missing tags
- Use sitemaps (WordPress still generates sitemaps via AIOSEO) and ensure frontend includes link to sitemap
When to Use Headless vs When to Avoid
Use headless when:
- You have frontend developers working with modern JS frameworks
- You need high performance and flexibility
- You want to serve content to multiple channels (web, mobile app)
- You want to modernize frontend decoupled from WP
Avoid headless when:
- Your site is small / simple and doesn’t need complexity
- SEO is mission-critical and you don’t have dev resources
- You rely heavily on WP theme or plugin features that expect templating
Conclusion & WP Care’s Role
If you’re considering converting your WordPress site into a headless setup, this step-by-step guide gives you a roadmap. With AIOSEO’s REST API addon, you can maintain SEO metadata, schema, social tags even in a decoupled architecture.
At WP Care, we specialize in WordPress maintenance, performance, security, and optimization. If you’d like help building or migrating to a headless WordPress setup, or ensuring your SEO remains intact, we can assist with architecture, development, or ongoing support.